
Alan McKenzie
2025
“I just got out of hardboot setup hell myself – now it’s more fun than I could have imagined – and the thing that really helped was just standing in the boots while in the bindings BUT without the boot liners. Adjust the bindings and boot cuffs so your lower legs are centered in the boot cuffs.”
Ryan Allen – Aspiring Carvers of Snowboarding Facebook group – Feb 2025
This article is a why Ryan’s insight is so useful, and a how to do it.
Snowboard carving is a balancing act. We manage to stand up without falling because the gravity force vector from our Centre of Mass (CoM) passes through our Base of Support (BoS).
The BoS refers to the area beneath an object or person that includes every point of contact that the object or person makes with the supporting surface. The larger the area of our BoS the more movement of our CoM can occur without us falling; a large BoS makes us more stable. To make ourselves more stable the stance for almost every athletic activity has the feet apart (not monoskiing), spreading and tilting our legs, including the lower legs and ankles. When we perform any movement we dynamically balance our CoM over our BoS.
How does our body move to tilt the board on edge then have CoM stay over BoS? Using ankles, knees, hips, trunk, & arms. Exactly how will vary depending upon whether our stance is more across the board or along the board, potentially every variation between duckfoot and skwal stances. Our hard boots and bindings are where our feet meet the board. Our leg joints are only able to work in the range between our hip joints at one end and where our lower legs are held in place by our boot cuffs & shells at the other. In the middle of that joint chain, our knees function only as hinges. Trying to make them do otherwise because our boot cuffs force us to bend them side to side will cause pain and/or injury. We need to push against our boot cuffs, but if our boot shells and cuffs push against us all the time pain and pressure injury is the result. Our legs need to be able to bend and return to allow our leg muscles to act as shock absorbers. We need to be able to push equally to either side to put the board on edge, but also be able to run with the base flat. Therefore the starting position for our legs and boots needs to be neutral, so our joints are comfortably aligned, boot cuff pressure is relieved between turns, turns can be made equally well to either side, and bumps in the line of motion can be absorbed. Boots (& bindings together) should enable these movements with all leg joints moving in their normal range of motion.
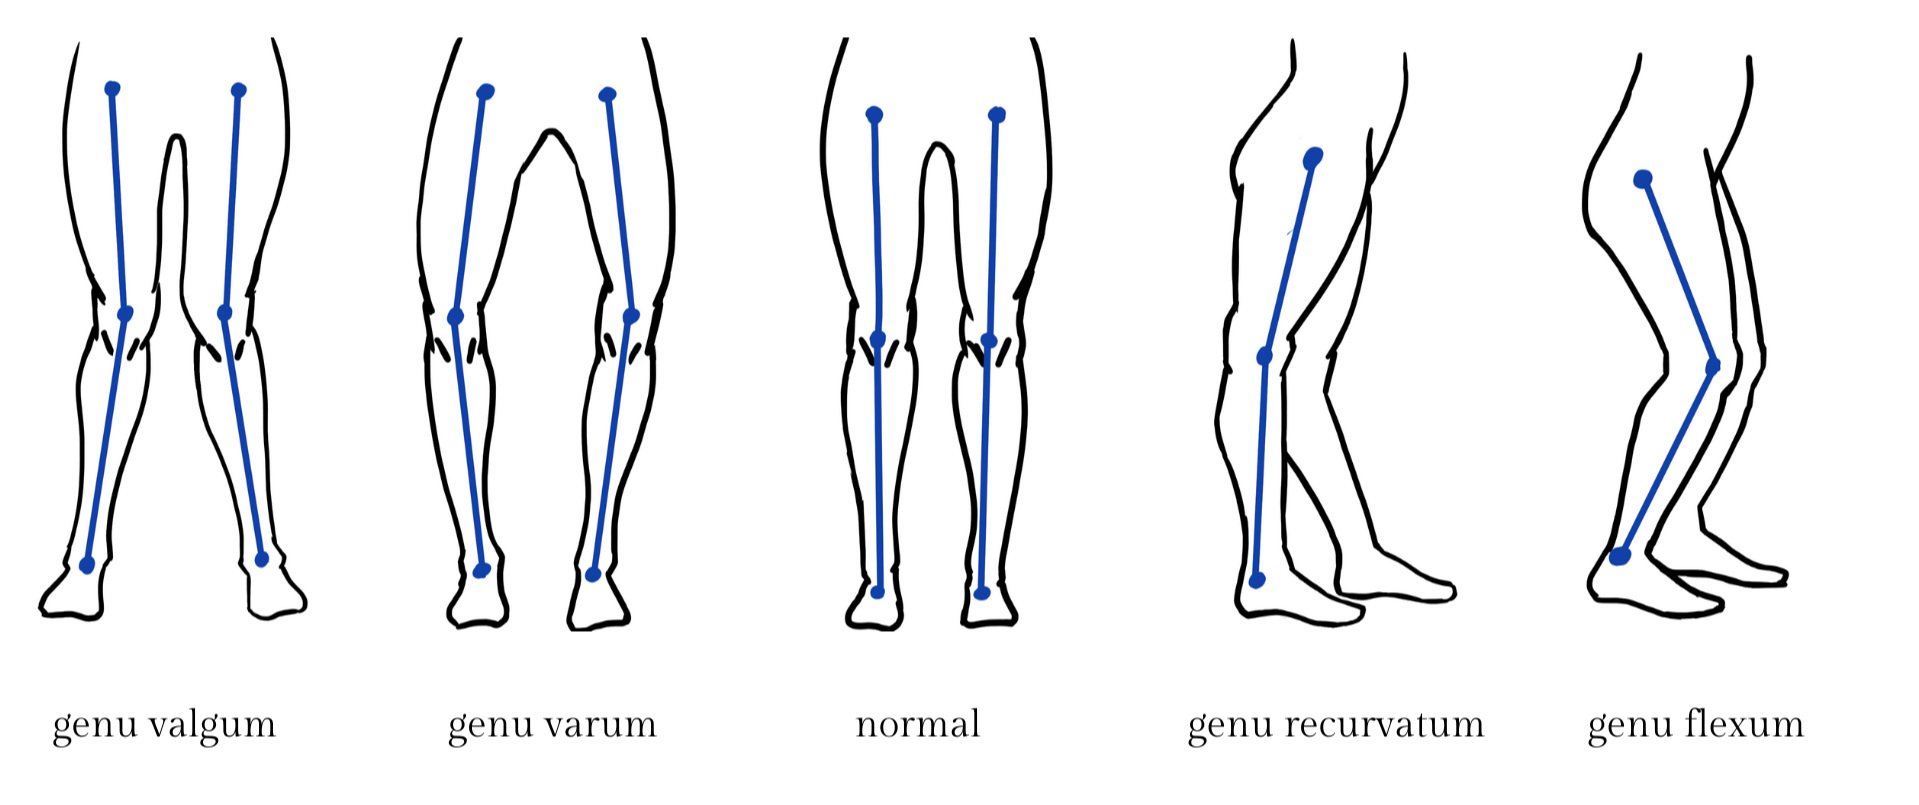
Your legs are probably not exact mirror images of each other. They may differ in length, curvature (knock kneed, bow legged, normal, hyperextended & flexed), muscle bulk, and history of injury and age related changes.
And your legs aren’t necessarily the same shape and proportions as someone elses’s. For people of the same height, womens legs tend to be shorter than mens, and within either sex of the same height leg lengths vary from the average by +/- 5%. The proportions of the thigh and lower leg varies as well. The ratio of thighbone (femur) length to lower leg (tibia) length varied from 1.16 to 1.39 in an American x-ray study of over 2000 adults.
So, because a) leg length, proportions and shapes vary & b) stance distances and binding angles vary
then the combinations of binding tilt (longitudinal tilt = lift, lateral tilt = cant), boot cuff canting, boot cuff front-to-back tilt, and then boot cuff flex control via spring systems and boot component materials to handle the tilt of our legs and the range of movement while riding, should be individualised.
How do you pull together all those variables? Don’t copy other people. Your setup has to fit you!
GOALS: Each boot cuff should be aligned with the rider’s lower leg when the rider stands in their preferred stance distance and binding angles as if they were riding base flat and in a straight line.
The cuff should be able to move through the rider’s desired range of movement, as their knees bend and their lower legs tilt in the act of riding, with the desired amount of resistance to that movement.
To achieve the alignment goal a rider may need to use some, or all, of the boot cuff alignment adjustments available i.e. binding cant and lift, & boot cuff cant and forward/back tilt.
(Analogous to ski boot cuff cant adjustment, boot sole canting, and cuff forward tilt adjustment to achieve a ski base flat on the snow.)
Process:
Take the liners out of your boots. If you have orthotics, put those back in your boots.
Clip the boots into your bindings at your preferred stance distance and angles.
Stand in the boots as if you were riding on a very gentle slope, base flat and in a straight line.
Are your legs centred in your boot cuffs, with an approx. equal gap
i) front-to-back and
ii) side-to-side?
Yes: no adjustment needed.
No: adjust the tilt of bindings & boot cuffs till both legs are centred, an approx. equal gap i) side-to-side and ii) front-to-back.
NB: Because knees don’t like being bent sideways, getting the side-to-side cuff angle to match each of your legs is a priority.
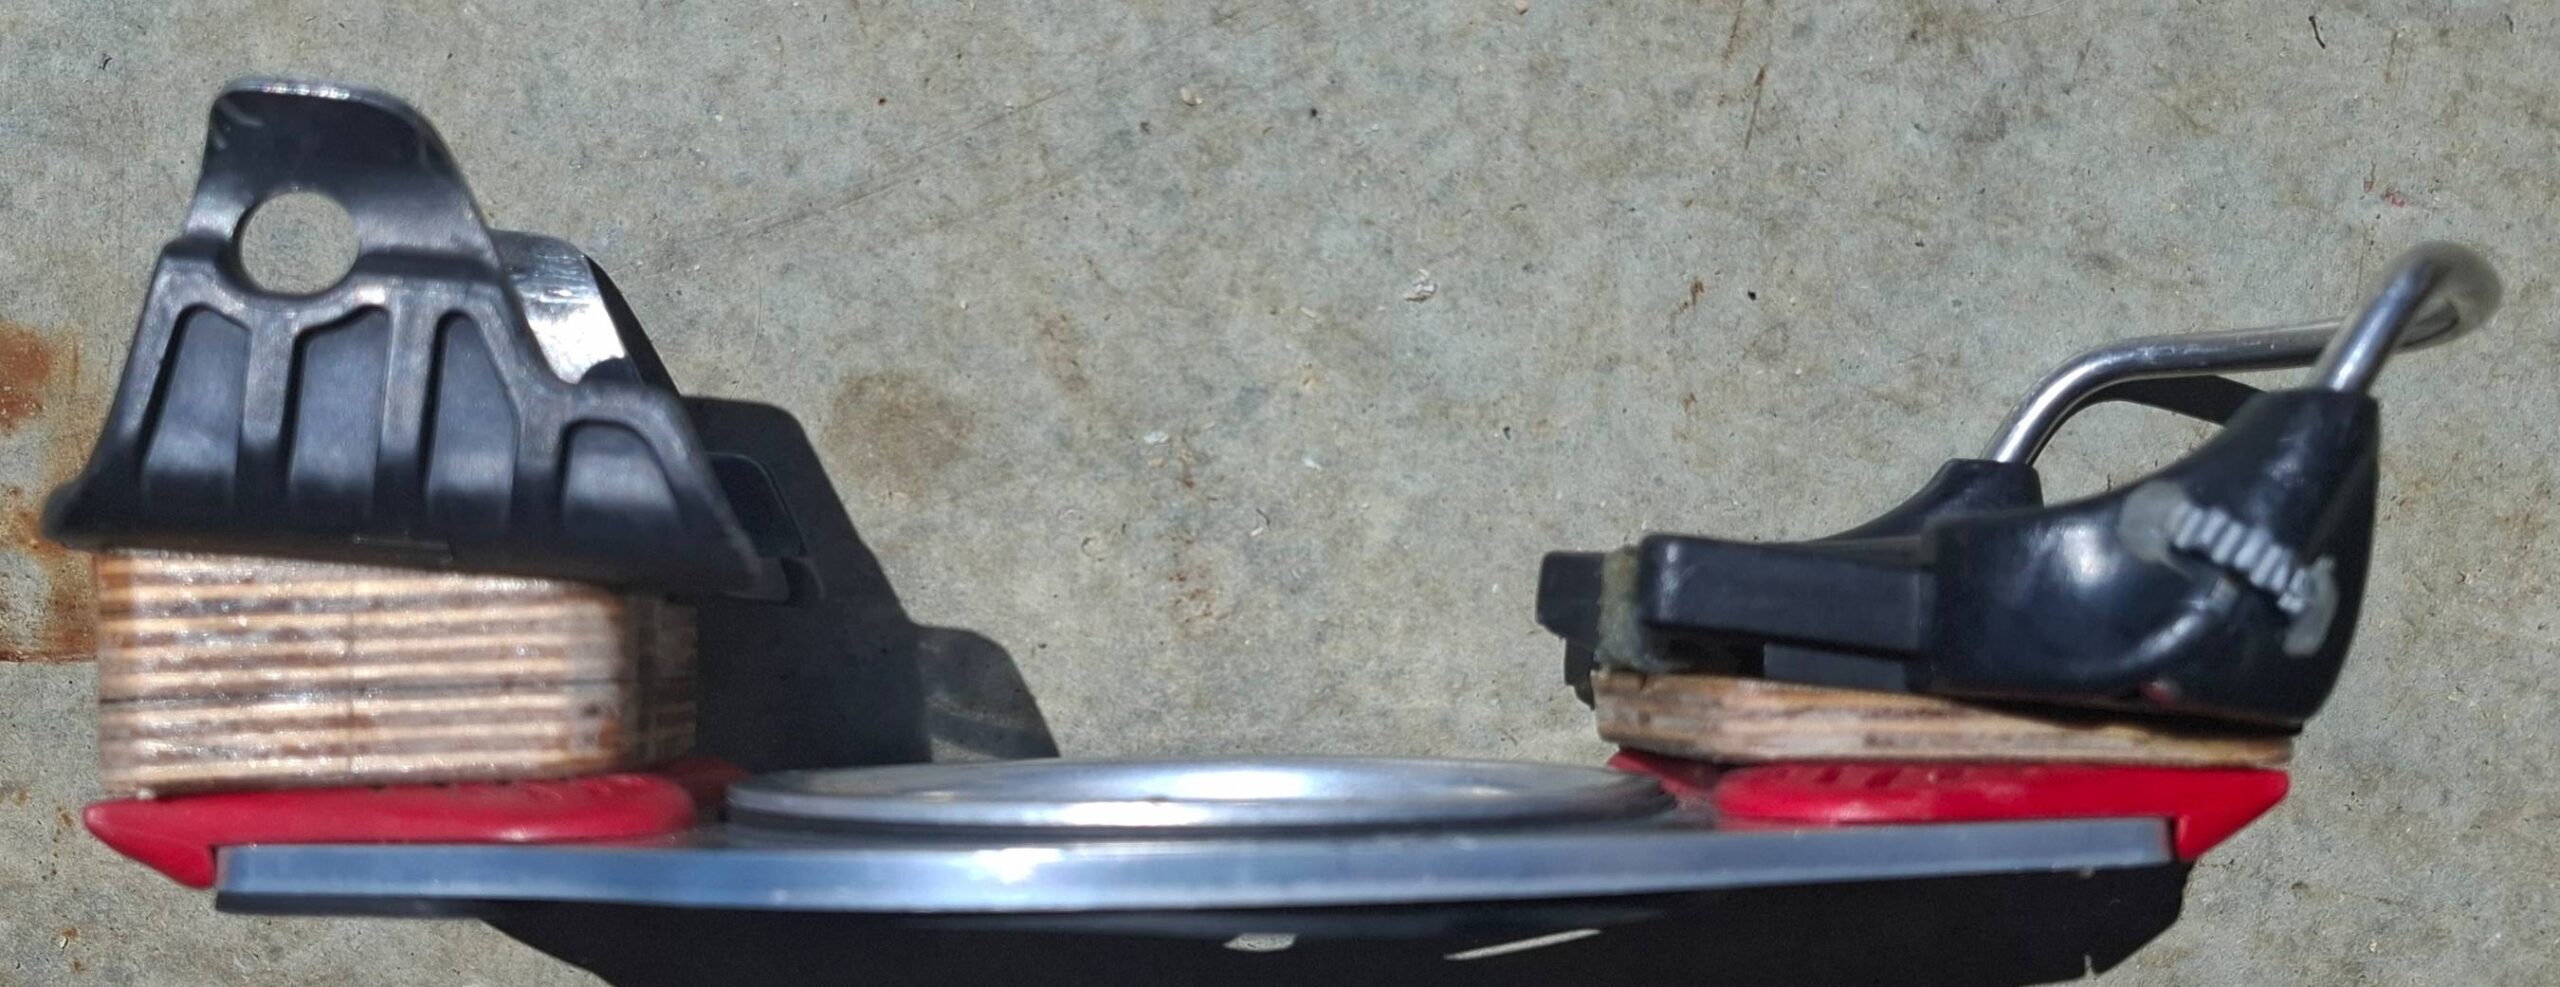
For the “carpet carving” adjustment phase if you have F2, SG or other bindings that have limited adjustment options and you need more tilt than your boots and bindings combined allow, use any available materials to alter the slope of your toe and heel sleds. When you’re happy with your setup, take the bindings off your board and measure the lift/cant combination you need using something like the Clinometer app (make sure you have zeroed the app properly and that the surface you are measuring on is level). Then build your own wedges using either the 3D printing options below, or with something like marine/exterior plywood + epoxy and cloth. I’ve been riding home made exterior or marine ply/epoxy/Dynel wedges on my F2s for years. Ply works well because the layers make it easier to check the smoothness of the slope and make the wedge unlikely to crack. I used MS Powerpoint to work out wedge corner heights for the desired slope and baseplate size.

Knees bend normally in roughly the same direction as our boot cuffs tilt around the cant discs near the ankles. Our current boots and bindings together have a much greater range of adjustment available for the front-to-back tilt of the boot cuff. People also have varying ranges of ankle flexion/extension mobility. You may well have a choice over the combination of binding lift and boot cuff position to achieve a central front-to-back leg alignment. Different combinations will change the amount of ankle flexion and the angle of the sole of your foot. Comfort should guide your choice.
Put the liners (and orthotics) back in. Now adjust the flex of your boots to achieve the range & resistance to movement you desire. Across board stances require different patterns of movement compared to stances aligned more along the board.
Boot Cuff Canting:
If you have not adjusted the lateral tilt of your boot cuffs before, all 3 major brands (Deeluxe, UPZ & Mountain Slope) have discs held by screws on either side of the heel that act as axles the cuffs tilt (rotate) around. If the screw is off centre and low relative to the disc centre, that side of the cuff is raised. If the screw is off centre and high relative to the disc centre, that side of the cuff is lowered. If the discs are set the same on both sides the rotation axis is horizontal. If they are not the same, the axis of rotation (disc centre to disc centre) is tilted and therefore the boot cuff is tilted.
Boot Cuff Tilt:
All 3 major brands have the ability to adjust the starting position of the cuff, some models stepwise, some smoothly through the available range.
Boot Cuff Forward/Back Flex:
Deeluxe as standard come only with a 5 option cuff position adjustment. Deeluxe relies on cuff/tongue/shell deformation for flex out of the box. In addition to options for shell, cuff and tongue stiffness, UPZ and Mountain Slope come with spring systems to allow adjustment of the flex.
There are aftermarket spring systems available for UPZ and Deeluxe. And there are varying stiffness springs available.
Using an aftermarket liner may also alter the flex you experience.
Binding lateral tilt and stance angles:
For riders with normal alignment of their thighs and lower legs, binding angles lower 50 degrees are likely to need some inward canting to get their cuffs aligned because side-to-side the feet are further apart than when standing straight. Between 50 to 65 degrees minimal to no canting is likely to be needed as here the legs are side-to-side roughly the same distance as when standing straight. Higher than 65 degrees (skinny and skwal stances) increasing amounts of outward canting is likely to be needed because side-to-side the feet are now being brought together.
Binding lift and stance angles:
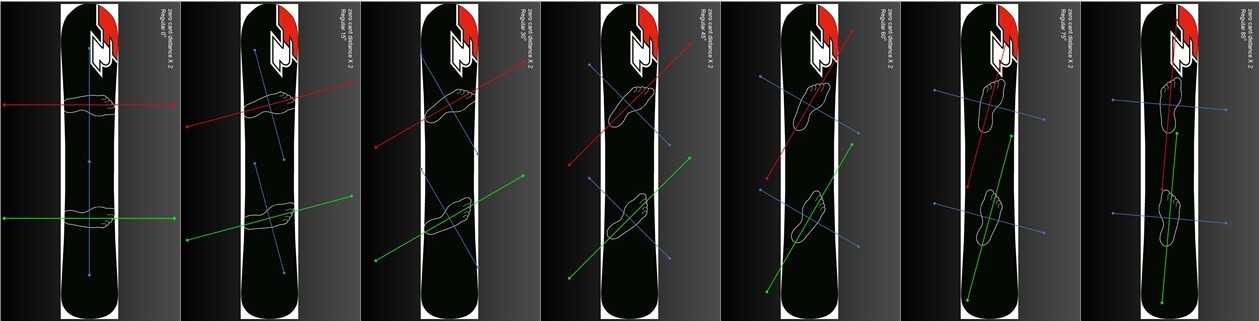
As binding angles increase the rider’s feet become less side by side and more one in front of the other. Accordingly rear foot heel lift and front foot toe lift become more likely to be needed as angles rise.
The diagram below shows how, for a fixed stance distance, increasing the binding angles changes the relative position of the feet.
Binding cant and lift wedges:
Catek:
These bindings are incredibly adjustable but no longer available new.
Bomber Trench Digger:
These have fine gradations of combined lift & canting available.
Trench Digger 6 degree lift/cant disc options table. Up to 3 deg of canting can be obtained for loss of <1 deg lift.
All lift/cant values halved for the 3 degree discs.
| Offset | 0 | 5 | 10 | 15 | 20 | 25 | 30 | 35 | 40 | 45 | 50 | 55 | 60 | 65 | 70 | 75 | 80 | 85 | 90 |
| Cant | 0.0 | 0.5 | 1.0 | 1.6 | 2.1 | 2.5 | 3.0 | 3.4 | 3.9 | 4.2 | 4.6 | 4.9 | 5.2 | 5.4 | 5.6 | 5.8 | 5.9 | 6.0 | 6.0 |
| Lift | 6.0 | 6.0 | 5.9 | 5.8 | 5.6 | 5.4 | 5.2 | 4.9 | 4.6 | 4.2 | 3.9 | 3.4 | 3.0 | 2.5 | 2.1 | 1.6 | 1.0 | 0.5 | 0.0 |
F2 Race bindings:
Standard F2 lift wedges are approx. 4 degrees slope. Standard cant wedges are approx. 3 degrees.
There is a configurable OpenSCAD 3D print file that allows customisable combinations of degrees of lift and cant (file says max. 8 degrees for each). The thread discusses some of the variables in the 3D printing process including choice of material.
https://forums.alpinesnowboarder.com/topic/46672-customizable-3d-printed-liftcant-wedges-for-f2-bindings/
https://bitbucket.org/12amtools/f2-binding-lift-cant-shims/src/master/
OR https://www.thingiverse.com/thing:2865271
OpenSCAD https://openscad.org/downloads.html
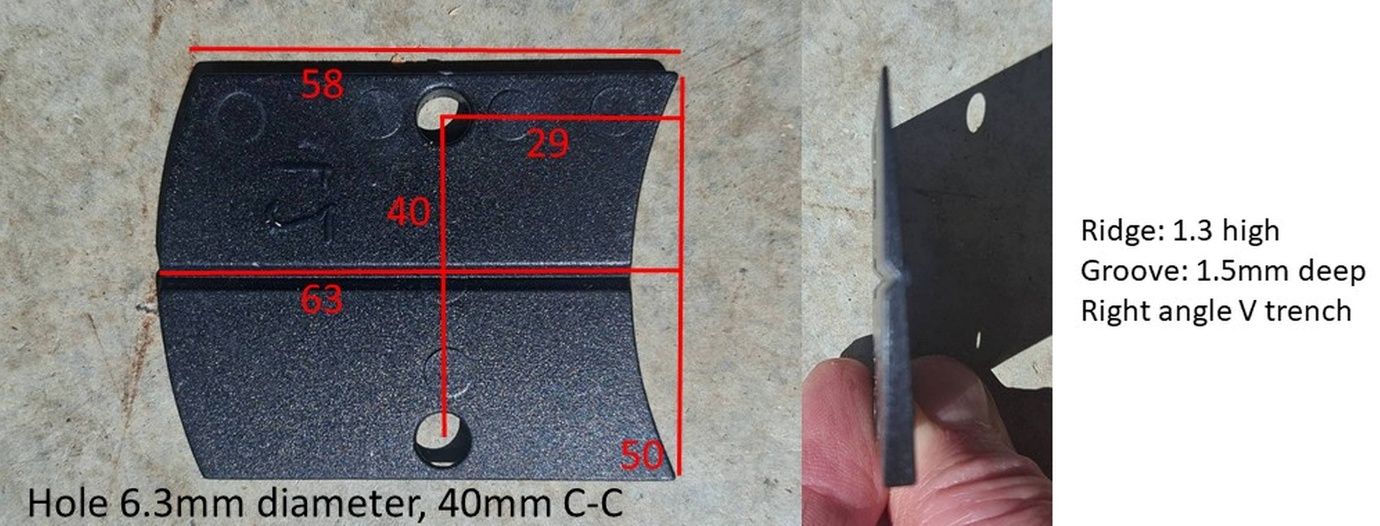
All measurements in mm. Hand measured using electronic caliper.
SG bindings: https://www.thingiverse.com/thing:7248470
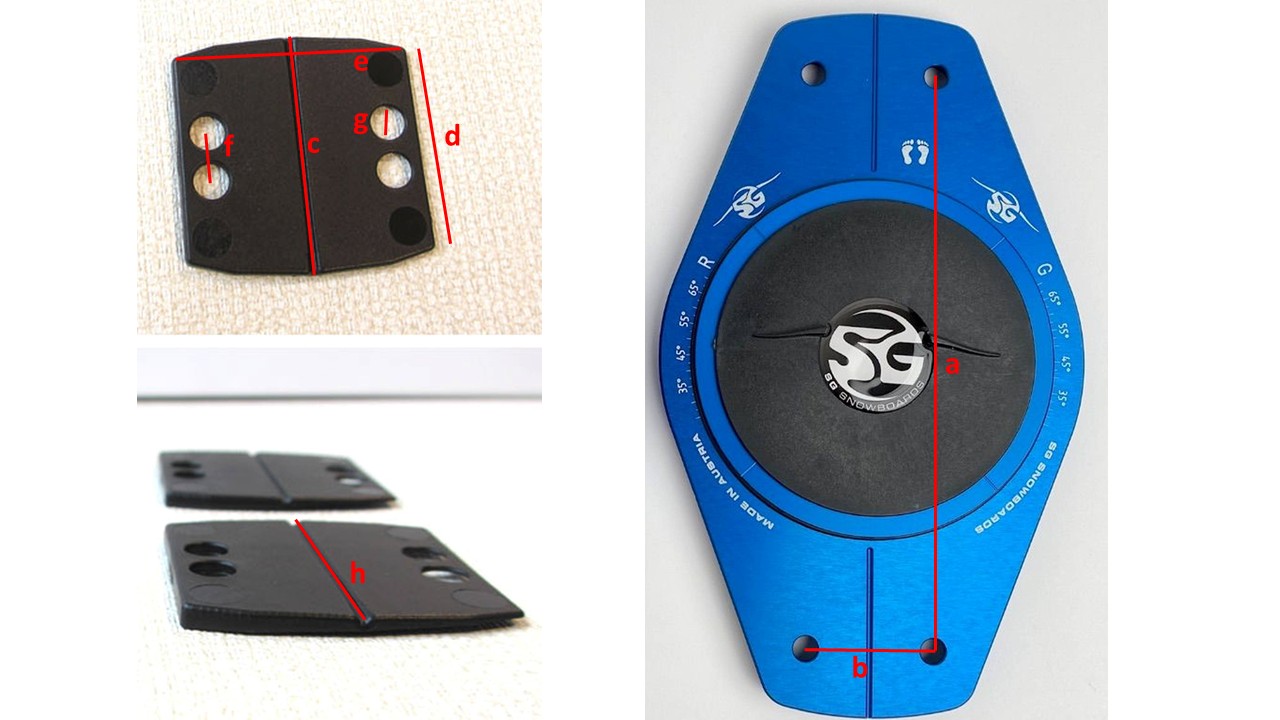
| a | b | c | d | e | f | g | h (all measurements in mm) |
| 175 | 37 | 50 | 42 | 51.5 | 11 | 7.5 | 1(width) x 1.5(height) ridge to fit notch, square sides, rounded top. |
These were hand caliper measured but should close enough to make usable wedges.
Other brands:
Users of brands with a limited range of canting wedges may have to either a) use combinations of binding and boot cuff canting or b) make their own binding cant wedges.
Softboot cant/lift plates (because some people ride both)
https://www.thingiverse.com/thing:2790669
Screws:
F2 have been using approx. 4 degrees of lift and 3 degrees of cant with standard pan head screws for years. Once you start needing 40mm or longer screws as your lift/cant angles increase then cup washers become useful to help with off axis loading (SG use cup washers). You will also need to make custom length screws to adequately engage the nut threads but not protrude. M6 is the common thread pattern for binding sled attachment, so M6 thread stainless steel screws, either 304 or 316 grade will handle the wet environment of this sport without rusting. Cut to desired length, use a fine file to trim cut end smooth. Rethreading the cut end using an M6 thread die is not usually necessary.
How hard should I try to find the “sweet spot”?
People have been successfully riding hard boots for many years without this level of tweaking. Many are probably close enough by virtue of their anatomical good fortune. Getting proper alignment should improve, comfort especially knee comfort and, range and freedom of movement. How far you go towards finding the “sweet spot” is up to you and the adjustability of the equipment available to you. For people who aren’t built to the standard model this may be a gamechanger. For me, fine tuning my boot cuff alignment helped me get my heelside and toeside turns more evenly matched.